Honing Tile Repair Skills to Restore a Hole Damaged Porcelain Tiled Kitchen Floor in Birkenhead Cheshire
We were contacted about a damaged Porcelain tiled floor on Christmas Eve by a customer in Birkenhead. Apparently, their teenage daughter had a birthday party with thirty of her friends in the Kitchen/Diner of their house and unfortunately several items were dropped on the tiled floor leaving large holes. Keen to have the problem resolved quickly I was asked to pop round as soon as possible to see what could be done.
I asked for some photos of the damage to be emailed over and enquired if underfloor heating (UFH) had been installed. I always ask this as it’s not possible to replace a tile if electric UFH has been installed due to the way the tile is fixed to the heating matt. UFH had not been installed so replacement would be possible assuming they had replacements or this style of tile was still in available.

Having discussed the options, we decided upon a blended repair using a specialist filler and paints. This seemed to be the least invasive approach and would certainly be the quickest, so I agreed to pop over the day after Boxing Day to do the repair.
Repairing Holes in Porcelain Tiles
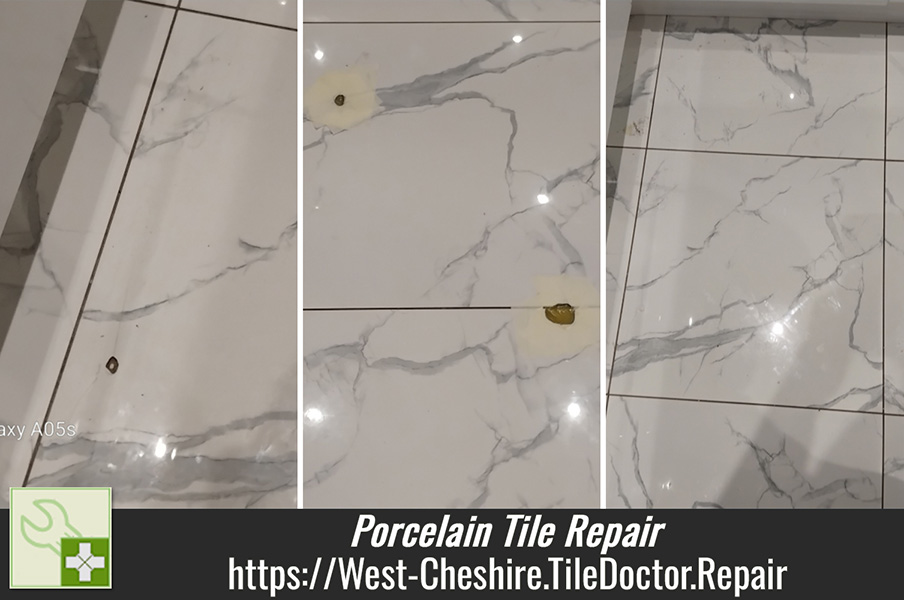
On arrival I took a good look around the floor to make sure all the damage had been identified. To be honest it looked like a bomb site with ten round holes in the floor; it was clear that the tiles had been “dot and dab” laid when installed so a lot of the tile had no adhesive underneath to support the weight. Anything dropped on the surface was able to penetrate the tile and go straight through making a perfect hole.

Work started by vacuuming the area to remove any debris, then each hole was tightly masked off with tape. The masking tape prevents excess filler from spreading onto the tile during the repair and makes it easier to concentrate it into the damaged area. The filler was pre-mixed with different colours before being applied to get it close to the right shade. We have a specialist kit for this that allows a little bit of dye to be added at a time until the filler matches the tile colour. Once ready all holes where filled and when dry smoothed and polished flat using different grades of wet and dry sandpaper applied with a flat disc.
Once the filler had dried the damaged areas were delicately painted to reproduce the appearance of natural stone veins that were a feature of these tiles. This helps blend the repair into the tile making it very difficult to spot. Once done the area was sprayed with a porcelain spray to seal in the repair.

All in it took four hours to repair the ten holes much to the relief of the customer who was over the moon and amazed with the result. For aftercare I recommended the use of Tile Doctor Neutral Tile Cleaner going forward as strong bleach-based products could affect the repair over time.
Source: Professional Porcelain Tile Repair and Restoration Service near Birkenhead Cheshire